Custom rich text editor styles for Content editor web part
3 May 2012
I received a request from business to restrict site editor not to use OOTB fonts and styles while they edit the contents of “Content editor web part” in SharePoint 2010. This is nice to have if you want consistent look and feel across the site without much end end-user training.
They asked me to create custom styles; apart from those styles the editor should not be able to apply any font, colours or styles on CEWP contents.
I have done these changes on “Page Layout”. If an editor creates any page using that page layout, he/she will only see custom styles while editing the “content editor web part” contents.
Below are the detailed steps to achieve this kind of functionality
1. Create custom CSS file (In my case I will call it “CustomRTStyles.css”) with custom styles , also hides OOTB fonts and mark-up styles options and upload it to “/Style Library/en-us/Core Styles/ CustomRTStyles.css”
(Change the below CustomRTStyles.css style sheet according to your requirement)
/* Custom rich text editor Styles list */

.custom-rteStyle-Heading1

{-ms-name:"Heading 1";

 color:#FF0000;

 font-size:30px;

 font-family:"Gill Sans MT";

 font-weight:bold;}

.custom-rteStyle-Heading2

{-ms-name:"Heading 2";

 color:#000000;

 font-size:24px;

 font-family:"Gill Sans MT";

 font-weight:bold;}

.custom-rteStyle-Heading3

{-ms-name:"Heading 3";

 color:#000000;

 font-size:20px;

 font-family:"Gill Sans MT";

 font-weight:bold;}

.custom-rteStyle-Heading4

{-ms-name:"Heading 4";

 color:#000000;

 font-size:18px;

 font-family:"Gill Sans MT";

 font-weight:bold;}

.custom-rteStyle-Paragraph

{-ms-name:"Paragraph";

 color:#969393;

 font-size:14px;

 font-family:"Arial, Helvetica, sans-serif" }

.custom-rteStyle-IntroParagraph

{-ms-name:"Intro Paragraph";

 color:#000000;

 font-size:12px;

 font-family:"Arial, Helvetica, sans-serif"}

/* To hide fonts tab */

#Ribbon\.EditingTools\.CPEditTab\.Font

{  display:none;}

/* To hide Markup styles tab */

#Ribbon\.EditingTools\.CPEditTab\.Markup

{display:none;}
2. Open the default master page in SharePoint 2010 designer and add the reference to newly created CSS style-sheet.
//
<link rel="stylesheet" type="text/css" href=" /Style%20Library/en-us/Core%20Styles/CustomRTStyles.css" />
Now save and publish the master page.
3. Open the page layout in SharePoint designer on which you what to apply custom editing styles.
4. Locate the RichHtmlField and add the following properties
PrefixStyleSheet=”custom-rte” AllowFonts=”false”
The < RichHtmlField > control with look like the following
//
<PublishingWebControls:RichHtmlField FieldName="PublishingPageContent"  HasInitialFocus="True" PrefixStyleSheet="custom-rte" AllowFonts="false" MinimumEditHeight="400px" runat="server"/>
Reference custom css inside page layout just before the <PublishingWebControls:EditModePanel> control
//
<SharePointWebControls:CssRegistration name="<% $SPUrl:~sitecollection/Style Library/~language/Core Styles/CustomRTStyles.css %>" runat="server"/>
5. Now add the jquery to force the “Content editor web part” to use custom styles while editing any contents. Locate the <PublishingWebControls:EditModePanel runat=”server”> and add the scripting inside it, the end result will look like following
<PublishingWebControls:EditModePanel runat="server">

<!-- Styles for edit mode only-->

<script src="https://ajax.googleapis.com/ajax/libs/jquery/1.7.2/jquery.min.js" type="text/javascript"></script>

<script type="text/javascript">

ExecuteOrDelayUntilScriptLoaded(function() {

 // window.setTimeout(function() {

 $("div[RteRedirect]").each(function() {

var id = $(this).attr("RteRedirect"),

editSettings = $("#" + id);

if(editSettings.length > 0 && editSettings[0].PrefixStyleSheet != 'custom-rte') {

editSettings[0]['PrefixStyleSheet'] = 'custom-rte';

editSettings[0]['StyleSheet'] = '\u002fStyle Library\u002fen-US \u002fCore Styles\u002fCustomRTStyles.css';

 RTE.Canvas.fixRegion(id, false);

 }

 });

// }, 2000);

}, "sp.ribbon.js");

</script> </PublishingWebControls:EditModePanel>
6. Save and publish the page layout.
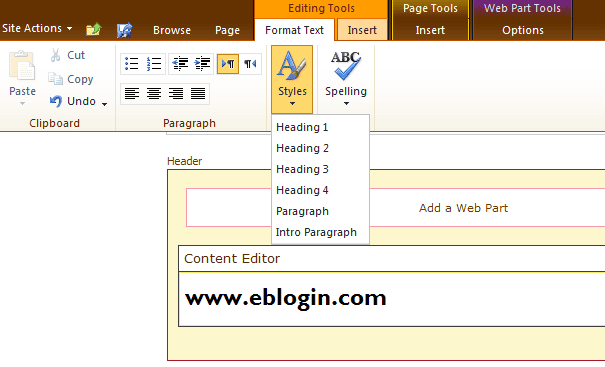
7. Now create new page in SharePoint 2010 page library by using updated page layout and add “Content editor web part”. The rich text editing tool will look different. I have attached the before and after images to give you guys feelings how the end results would look like.
Before changes
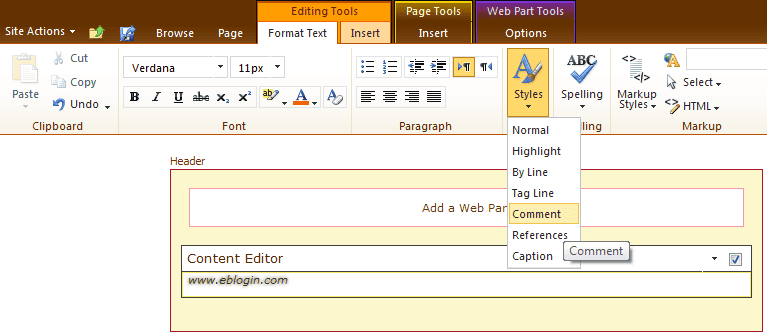
After changes