

11 November 2013
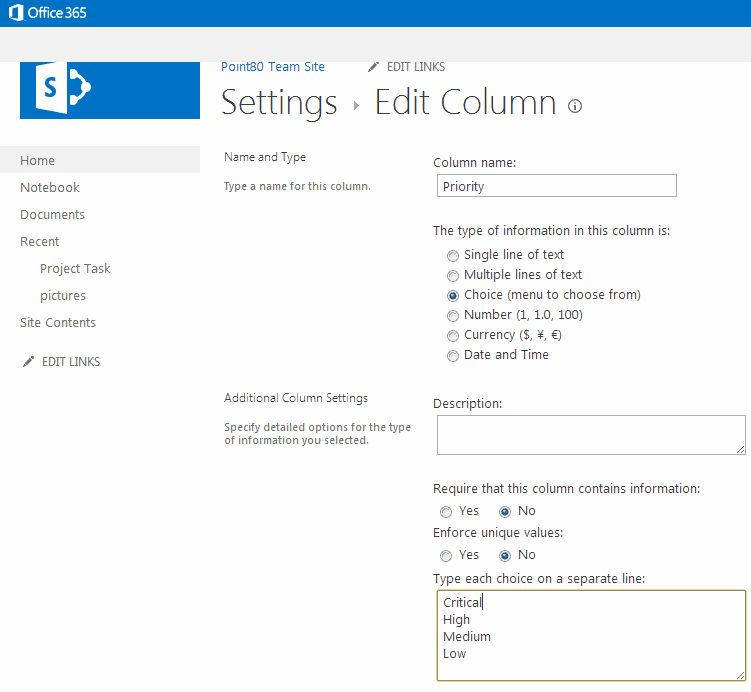
Today I am going to show you that how easy it is to render SharePoint 2013 list fields the way you want via JSLink. For the purpose of this demo I have created a task list and updated the choice of “Priority” field to (Critical, High, Medium, Low) as appear below.
Now I want to show different background colours for different priority value to visualize the tasks in better way.
To do this, create a new file called RenderField.js and copy paste the below code.
// Create a namespace for our custom functions
var ebloginSpace = ebloginSpace || {};
// Create function for rendering the field value
ebloginSpace.myFiledRender = function ()
{
    var myFieldOverride = {};
    myFieldOverride.Templates = {};

    myFieldOverride.Templates.Fields =
    {
        'Priority': { 'View': ebloginSpace.GetFieldColour }
    };
    // We need to register the rendering template
    SPClientTemplates.TemplateManager.RegisterTemplateOverrides(myFieldOverride);
};
// Create a function to change the Priority Field background color depending on the selected value.
ebloginSpace.GetFieldColour= function (ctx) {
    var Priority = ctx.CurrentItem.Priority;

     if (Priority.indexOf("Critical") != -1) {
        return "<div style='background-color: #F54949; display: block; padding-left: 10px; width: 100%;'>" + Priority + "</div>";
    }
	if (Priority.indexOf("High") != -1) {
        return "<div style='background-color: #E890C2; display: block; padding-left: 10px; width: 100%;'>" + Priority + "</div>";
    }
    if (Priority.indexOf("Medium") != -1) {
        return "<div style=';background-color: #DCF551; display: block; padding-left: 10px; width: 100%;'>" + Priority + "</div>";
    }
    if (Priority.indexOf("Low") != -1) {
        return "<div style='background-color: #85DEA0; display: block; padding-left: 10px; width: 100%;'>" + Priority + "</div>";
    }
    return ctx.CurrentItem.Priority;
};

// Call the function.
ebloginSpace.myFiledRender();
There are many ways to bind JS file to a list. You can bind it to content type , views, site columns, add reference in list view web part properties etc.
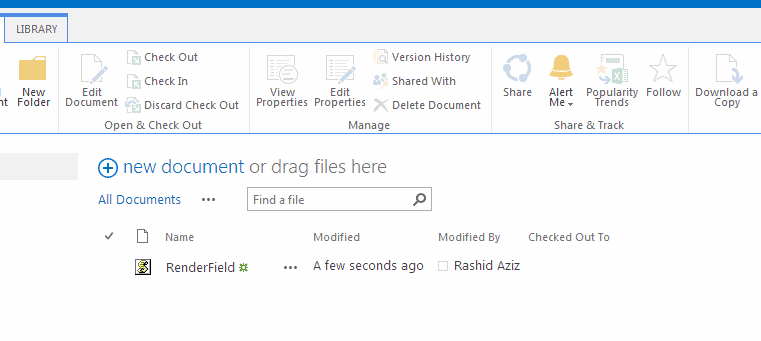
Upload the RenderField.js file to Styles library as shown below.
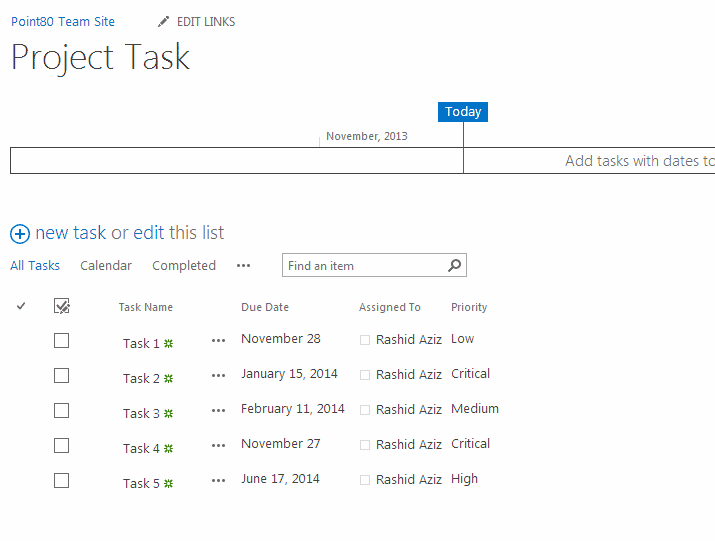
This is how task list look like before using our custom rendering JSLink file.
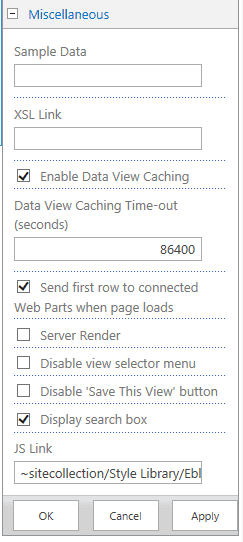
For this demo I have added JSLink to web part property of Task list view, under Miscellaneous section there is JS Link property, add RenderField.js file reference here. (Hint: ~sitecollection/styles/…..)
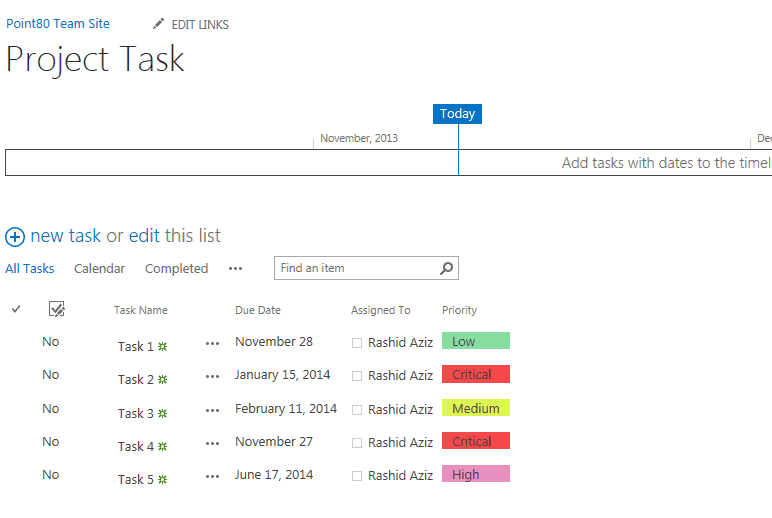
Apply the settings and stop editing the page form ribbon. The task list view “Priority” column data will render with different background colours depending on Priority value.
This is a simple example to show how easy it is to render list view fields the way you like.
Today I am going to show you that how easy it is to render SharePoint 2013 list fields the way you want via JSLink. For the purpose of this demo I have created a task list and updated the choice of “Priority” field to (Critical, High, Medium, Low) as appear below.
Now I want to show different background colours for different priority value to visualize the tasks in better way.
To do this, create a new file called RenderField.js and copy paste the below code.
// Create a namespace for our custom functions
var ebloginSpace = ebloginSpace || {};
// Create function for rendering the field value
ebloginSpace.myFiledRender = function ()
{
    var myFieldOverride = {};
    myFieldOverride.Templates = {};

    myFieldOverride.Templates.Fields =
    {
        'Priority': { 'View': ebloginSpace.GetFieldColour }
    };
    // We need to register the rendering template
    SPClientTemplates.TemplateManager.RegisterTemplateOverrides(myFieldOverride);
};
// Create a function to change the Priority Field background color depending on the selected value.
ebloginSpace.GetFieldColour= function (ctx) {
    var Priority = ctx.CurrentItem.Priority;

     if (Priority.indexOf("Critical") != -1) {
        return "<div style='background-color: #F54949; display: block; padding-left: 10px; width: 100%;'>" + Priority + "</div>";
    }
	if (Priority.indexOf("High") != -1) {
        return "<div style='background-color: #E890C2; display: block; padding-left: 10px; width: 100%;'>" + Priority + "</div>";
    }
    if (Priority.indexOf("Medium") != -1) {
        return "<div style=';background-color: #DCF551; display: block; padding-left: 10px; width: 100%;'>" + Priority + "</div>";
    }
    if (Priority.indexOf("Low") != -1) {
        return "<div style='background-color: #85DEA0; display: block; padding-left: 10px; width: 100%;'>" + Priority + "</div>";
    }
    return ctx.CurrentItem.Priority;
};

// Call the function.
ebloginSpace.myFiledRender();
There are many ways to bind JS file to a list. You can bind it to content type , views, site columns, add reference in list view web part properties etc.
Upload the RenderField.js file to Styles library as shown below.
This is how task list look like before using our custom rendering JSLink file.
For this demo I have added JSLink to web part property of Task list view, under Miscellaneous section there is JS Link property, add RenderField.js file reference here. (Hint: ~sitecollection/styles/…..)
Apply the settings and stop editing the page form ribbon. The task list view “Priority” column data will render with different background colours depending on Priority value.
This is a simple example to show how easy it is to render list view fields the way you like.