
SharePoint 2013 Custom List Form
using Angular JS and Bootstrap

3 March 2015
According to Microsoft InfoPath Forms Services for SharePoint Server 2013 will be supported until April 2023. Keeping that in mind I have started looking into alternatives to build rich form which can be used with SharePoint list and replace OOTB form. I have started looking into Angular JS (AngularJS is a JavaScript framework. AngularJS extends HTML attributes with directives and binds data to HTML with expressions). From user interface point of view I spend some time with bootstrap (Bootstrap makes front-end web development faster and easier).
In the below example, I will use both AngularJS and Bootstrap to build custom SharePoint 2013 form to create new list items.
For this demo purpose, I will use SharePoint page with “Script Editor” to build this form. I highly recommend to use visual studio to build .aspx and .js files and update list schema to change lists default New/Edit forms.
1.Create “Customer Details” list which have the following column
|
Schema name |
Display name |
|
Title |
First name |
|
LastName |
Last name |
|
Address |
Address |
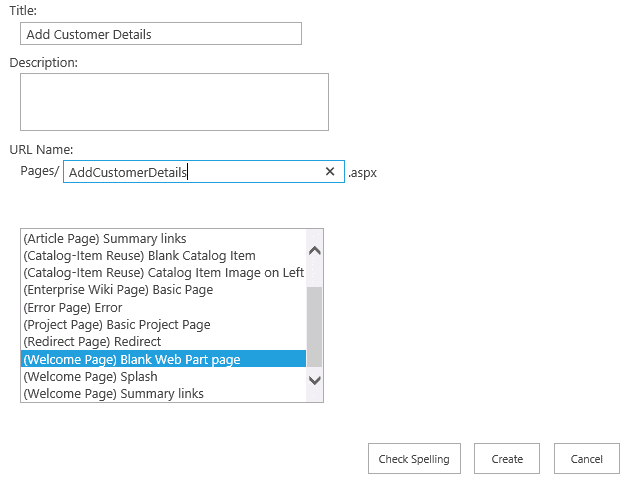
2. Now create a new page in SharePoint 2013 “Pages” library.
3. Add “Script Editor” web part on the page.
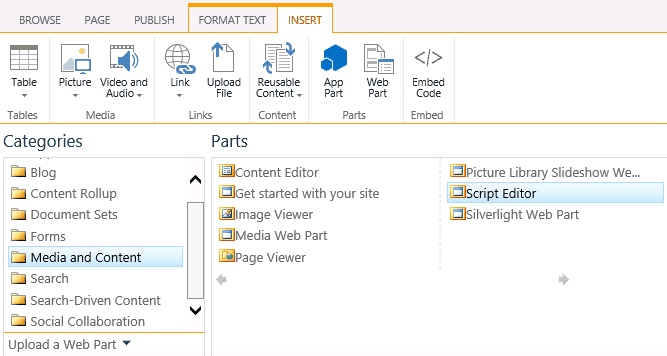
4. Copy and paste the following code inside script editor
<script src="//ajax.googleapis.com/ajax/libs/angularjs/1.2.15/angular.min.js"></script>
<script>
    function mainController($scope) {

        $scope.customer = { firstName: "", lastName: "", location: "" };
        $scope.createContact = function ($event) {
            var c = $scope.customer;
            $event.preventDefault();

            var clientContext = new SP.ClientContext.get_current();
            var web = clientContext.get_web();
            var list = web.get_lists().getByTitle('Customer Details');
            var customerListItemInfo = new SP.ListItemCreationInformation();
            var listItem = list.addItem(customerListItemInfo);
            listItem.set_item('Title', c.firstName);
            listItem.set_item('LastName', c.lastName);
             listItem.set_item('Address', c.address);
            listItem.update();
            clientContext.executeQueryAsync(
                Function.createDelegate(this, onQuerySucceeded),
                Function.createDelegate(this, onQueryFailed)
            );

        };

        onQuerySucceeded = function () {
            alert('Successfully created new customer record');
        }

        onQueryFailed = function (sender, args) {
            alert('Failed: ' + args.get_stackTrace());
        }
    }
</script>

<h2>Customer Information:</h2>
<br />
<div ng-app="">
    <div ng-controller="mainController">
        First name
        <input type="text" ng-model="customer.firstName" /><br />
        <br />
        Last name
        <input type="text" ng-model="customer.lastName" /><br />
        <br />
        Address
		<input type="text" ng-model="customer.address" /><br />
        <br />
        <input type="submit" value="Save" ng-click="createContact($event)" />
    </div>
</div>
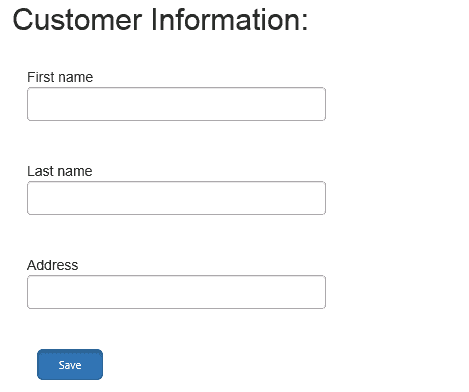
5. Save the page and publish it. The form will look something like this.

You can now go ahead and start using the form to create new customer records, but I like to make the user interface a little better.
To do that, I have added bootstrap css library reference and added some classes with html elements.
<script src="//ajax.googleapis.com/ajax/libs/angularjs/1.2.15/angular.min.js"></script>
<script>
    function mainController($scope) {

        $scope.customer = { firstName: "", lastName: "", location: "" };
        $scope.createContact = function ($event) {
            var c = $scope.customer;
            $event.preventDefault();

            var clientContext = new SP.ClientContext.get_current();
            var web = clientContext.get_web();
            var list = web.get_lists().getByTitle('Customer Details');
            var customerListItemInfo = new SP.ListItemCreationInformation();
            var listItem = list.addItem(customerListItemInfo);
            listItem.set_item('Title', c.firstName);
            listItem.set_item('LastName', c.lastName);
             listItem.set_item('Address', c.address);
            listItem.update();
            clientContext.executeQueryAsync(
                Function.createDelegate(this, onQuerySucceeded),
                Function.createDelegate(this, onQueryFailed)
            );

        };

        onQuerySucceeded = function () {
            alert('Successfully created new customer record');
        }

        onQueryFailed = function (sender, args) {
            alert('Failed: ' + args.get_stackTrace());
        }
    }
</script>
      <link data-require="bootstrap-css@*" data-semver="3.0.0" rel="stylesheet" href="//netdna.bootstrapcdn.com/bootstrap/3.0.0/css/bootstrap.min.css" />
<h2>Customer Information:</h2>
<br />
<div ng-app="">
    <div ng-controller="mainController" class="col-xs-5 selectContainer form-group">
        First name
        <input type="text" ng-model="customer.firstName" class="form-control"/><br />
        <br />
        Last name
        <input type="text" ng-model="customer.lastName" class="form-control" /><br />
        <br />
        Address
		<input type="text" ng-model="customer.address" class="form-control" /><br />
        <br />
        <input type="submit" value="Save" ng-click="createContact($event)" class="btn btn-primary btn-lg active" />
    </div>
</div>
You can see the difference as it look more professional after adding couple of bootstrap css classes.
I hope the above demonstration is helpful.